It has been a while, hasn't it?!?! Got to start writing again.
Right now I'm going to go back to macro and close-up photography. Something I started back at http://cornicello.blogspot.com/2007/05/which-macro-lens-should-i-get.html
Here I want to talk about the various ways to do close-up photography, especially concentrating on supplementary lenses (sometimes called Closeup Filters).
They typically come in powers or diopters, such as +1, +2, +3, +4
These affect the working distance (distance from the lens to the subject), as opposed to focusing distance (distance from film/sensor to the subject). They shorten the focal length of the lens they are attached to. The shorter the original lens, the less effect. And because they shorten the lens focal length you run into issues like short working distance (no room for lights, too close to some live subjects) and too much background coverage (you see the house next door, the sky, etc., etc.). My suggestion is to use the longest practical lens you can for the situation. Minimum 100mm for full-frame Macro (or 60mm for a crop factor digital camera). But preferably 150 to 200mm. This is so you can isolate your subject from the background. 50mm macro lenses are great for flat copy type work (postage stamps, etc.). But in the field they are generally too short for most situations.
The formula for figuring out the new focal length is 1000/((1000/focal length)+diopter)
Examples:
50mm lens with a +3 diopter
1000 / ((1000/50)+3)
1000 / (20+3)1000 / 23 = 43.5mm
24mm lens with +2 diopter
1000 / ((1000/24)+2)
1000 / (41.7+2)
1000 / 43.7 = 22.8
100mm lens with +1 diopter
1000 / ((1000/100)+1
1000 / (10+1)
1000 / 11 = 91mm
100mm lens with +3 diopter
1000 / 13 = 77mm
No matter what the original focal length of the lens, it will focus at the same distance. At infinity that distance will be approximately 1 meter divided by the diopter power. A +1 lens focuses at 1 meter (~39 inches) in front of the lens. A +2 focuses at 1/2 meter (~19.5 inches). A +3 at 1/3 meter (~13 inches). A +4 focuses at 1/4 meter (~10 inches), etc. You can combine them. For example a +1 and a +3 would equal a +4 and focus at a maximum of .25 meters. You lose distant/infinity focus when using closeup lenses. If you combine closeup filters put the stronger one closer to the camera and don't stack more than two.
As all lenses with the same closeup lens attached focus at the same distances, the longer lenses will show more magnification. But with the increased magnification you run into sharpness issues, especially around the edges of the frame.
Canon and Nikon make dual-element close up filters that are better quality with longer lenses. Canon offers two. The 500D is a +2 diopter and the 250D is a +4 diopter. The names come from the working distance. A +2 diopter lens focuses at a maximum 1/2 meter (500 mm) and a +4 focuses at a maximum 1/4 meter (250mm). They recommend the 250D for lenses from 28mm to 135mm and the 500D for lenses from 75mm to 300mm. The 250D is available in 52mm and 58mm sizes. The 500D is available in 52mm, 58mm, 72mm, and 77mm sizes.
The Nikon closeup filters have names like 0, 1, 2, 3T, 4T, 5T, and 6T. The 3T and 4T are for medium telephoto lenses (like the Canon 250D) and the 5T and 6T work with longer lenses. The 0 through 4T filters are 52mm in diameter, the 5T and 6T are 62mm.
Focusing and composing can be quite different in macro photography than in general photography. If you are interested in reproduction ratios, for example you want to get an image that has a 1:1 size relationship between the subject and the image projected onto the film/sensor) you would set the lens focus for the 1:1 ratio and then move the entire camera back/forward to achieve focus. If you turn the lens's focusing ring you change the reproduction ratio. If you are not as concerned with an exact scientific number, you can combine lens focus control with camera distances. But it may be a little confusing at first. And you have to remember that you will have a maximum focusing distance and infinity focus will not be available.
Other alternatives for close-up photography are teleconverters and extension tubes.
Teleconverters magnify the image while maintaining the same closest focus distance of the lens. So a 100mm lens with a 1.4x converter becomes a 140mm lens, but still focuses as close as it did without the converter allowing you some extra magnification.
Extension tubes move the lens further away from the camera body, allowing the lens to focus on objects closer to it.
Both converters and extension tubes involve light loss, but through-the-lens metering should compensate. Still consider that you will need more light or longer exposures with these. And you can combine them, too.
Macro lenses are the best option if you will be doing a LOT of macro work. Their downside is extra cost. Again, my preference is for something at least 100mm focal length with a full frame camera. With a cropped sensor camera, I would start at around 60mm or longer.
Tuesday, November 13, 2007
Wednesday, June 27, 2007
Update on the Bare Images art show

Original blog entry: http://cornicello.blogspot.com/2007/06/legs-2.html
Bare Images show schedule:
Friday Night Preview Party:
7:pm-11pm
Show hours:
Saturday July 7th 10:00am to 8:00pm
Sunday July 8th 10:00am to 5:pm
(I plan to be there on Sunday to meet guests)
Live Life Drawing sessions:
Saturday 11-1pm and 3-5pm.
Sunday 10:30-12:30pm and 2:30-4:30
Bring your favorite medium and Paint, Draw, Sculpt or Photograph (bring along a model release form)
A talk By Prof. Mark Storie on "The nude in art" (Time to be announced)
BBQ and Beverages all weekend
Gift shop (I will have some greeting cards available in the gift shop)
Camping and RV sites
If you have questions regarding the show or if you wish to be on the mailing list for next year contact:
Russ Riddell
(360)420-0786
rrphoenix@netzero.net
Park Info and camping rates contact:
LARC...(Lake Associates Recreation Club)
(360) 445-6833
http://www.larcnudists.com/
Directions: http://www.larcnudists.com/Directions.pdf
Kudos... Raves... Awards...
Just wanted to share some recent comments and awards.
From class evaluations for the Martha Casanave Portrait and Figure class that I assisted in at the Coupeville Arts Center...
"John Cornicello ranks among the best class assistants in my experience. He was equally attentive to both the teacher and the students, was organized and prepared, anticipated what would be needed, and was a pleasure to interact with."
Don't forget that I am teaching an introductory class on how to use your camera at Coupeville in October, 2007.
And from the Seattle Photographic Society... Last night I was given a bunch of year end awards (the club's year is June to May)...
First Merit Award in General Division
Second Merit Award in General Division
Honors Achievement Group for General Division (avg score of 40.9 points)
First People's Choice award in General Division
Photographic Excellence 2006/2007 First Place General Division (avg 40.9 points)
Third Place for total points accumulated in General Division (476 points)
Third Place for "Best General Image/Projected" category for "Aurora Twilight"
Third Place for "Best Nature Image/Projected" category for "Pelicans"
Honorable mention for "Best Creative Image/Projected" for "Savings"
I really wan't expecting all that. So thank you to everyone who voted throughout the year.
You can view the images I've shown at the Seattle Photographic Society meetings on my Flickr stream.
Sunday, June 24, 2007
Art Show coming up in July
On July 7 and 8 some of my prints will be on display (and available for sale) at the Bare Images art show near Mt. Vernon, WA. I will have five 11x14 prints (matted in 16x20 frames) in the show. More information is available at the LARC website.

Sunday, June 10, 2007
Aerialistas Car Wash
Seattle's favorite aerial performers, the Aerialistas are having a benefit carwash on Sunday, June 17 at 11am. Location is the parking lot of the 76 station at the Montlake entrance ramp to highway 520 in Seattle.
More photos available here.

More photos available here.
Saturday, June 2, 2007
Making Music
 In addition to photography, I also play music with a band called the Fremont Philharmonic.
Today we are playing at the celebration of the re-opening of the Fremont Bridge in Seattle. The party starts at 1pm, we play around 1:45 or so on the Fremont side of the bridge in the Solstice Plaza next to Blue Moon Burgers.
I need to find out if there is any truth to the rumor that the bridge work has a corporate sponsor. Think of it... The little blue bridge that goes up on command.
Every time the bridge rises they could have a light-up sign on the side saying "Viagra".
Wednesday, May 23, 2007
Depth of Field
Wow, this is a tough subject. So many people get so confused by this subject.
While researching to try to write up my own thoughts on it I ran across a site by Paul va Walree that already had all the answers. You can find it here.
Paul brings in things other sites overlook, such as print size or projected size and viewing distance (see the Visual Acuit section). He demonstrates how depth of field (DOF) does not normally vary with focal length (see the Background Blur section). I say normally because the construction of some lenses (symetrical, retro focus, telephoto, etc.) can have a little effect. Many folks are surprised to learn that some longer focal length macro lenses sometimes offer more depth of field than a shorter focal length lens. He also talks about why DOF scales on lenses are inadequate (see the Hyperfocal distance section).
For more on DOF scales and DOF tables I suggest reading some things from Harold M. Merklinger. Start with his Depth of Field Revisited article. Then you can follow it up by reading Merklinger's book The Ins and Outs of Focus (available as a PDF file).
Going back to Paul van Walree, he has a few other articles online that are going to save me from doing a lot of writing. I highly recommend these to all serious photographers interested in the technical side of things:
http://www.vanwalree.com/optics.html
http://www.vanwalree.com/optics/misconceptions.html
http://www.vanwalree.com/optics/filterflare.html
If you want to go even deeper into diagrams and math you can check out Norman Korens article on Depth of Field. A couple of summaries from that site:
While researching to try to write up my own thoughts on it I ran across a site by Paul va Walree that already had all the answers. You can find it here.
Paul brings in things other sites overlook, such as print size or projected size and viewing distance (see the Visual Acuit section). He demonstrates how depth of field (DOF) does not normally vary with focal length (see the Background Blur section). I say normally because the construction of some lenses (symetrical, retro focus, telephoto, etc.) can have a little effect. Many folks are surprised to learn that some longer focal length macro lenses sometimes offer more depth of field than a shorter focal length lens. He also talks about why DOF scales on lenses are inadequate (see the Hyperfocal distance section).
For more on DOF scales and DOF tables I suggest reading some things from Harold M. Merklinger. Start with his Depth of Field Revisited article. Then you can follow it up by reading Merklinger's book The Ins and Outs of Focus (available as a PDF file).
Going back to Paul van Walree, he has a few other articles online that are going to save me from doing a lot of writing. I highly recommend these to all serious photographers interested in the technical side of things:
http://www.vanwalree.com
http://www.vanwalree.com
http://www.vanwalree.com
If you want to go even deeper into diagrams and math you can check out Norman Korens article on Depth of Field. A couple of summaries from that site:
"DOF is much more closely related to magnification and f-stop; DOF expressed in distance is nearly independent of focal length."
"Those who use depth of field scales, tables, and formulas (e. g. for hyperfocal settings), restrict themselves – most probably without knowing why – to the image quality potential of an average pre-World-War-II emulsion."
(above is actually a quote from Carl Zeiss Camera Lens News at http://www.zeiss.de/C12567A8003B8B6F/EmbedTitelIntern/CLN01e/$File/CLN1.pdf (PDF File))
Tuesday, May 22, 2007
Martha Casanave Workshop in Coupeville, WA
 Just a few weeks until Martha's "The Portrait and the Figure" workshop (June 14-17, 2007). I will be the class assistant for this workshop...
This four-day workshop will address the following issues: What exactly defines a portrait, and how is it different from the portrayal of the nude? What are the similar issues involved in both approaches? What are 'traditional' portrait and figure photography, and what are some alternative, non-traditional approaches? How is the relationship with your model affected by the exchange of money? Using readings, discussion and camera work with each other and nude models (male and female); we will explore topics such as helping sitters relax, posing, nonverbal communication, and the relationship between model and photographer. Casanave will present practical techniques for dealing with these issues, and will also demonstrate, using Polaroid materials, an on-location indoor environmental portrait. The class will build the portrait together, 'from scratch,' solving, one by one, the problems of natural lighting, composition, background, placement of subject(s), and posing. Anyone interested in photographing people is welcome to join this workshop; previous experience with this subject matter is not necessary, though a basic knowledge of photography is required.
Martha's bio is at:
http://www.coupevillearts.org/asp-bin/inst_bio.asp?InstructorID=334
Cost is $400 plus a $100 fee for the class models. But if you tell them I referred you to the class you can get a $20 discount.
http://www.coupevillearts.org/ or call them at 360-678-3396
Light, Gesture, Color
I just spent a great three days with photographer Jay Maisel. Lots of things still going through my head. I thought I'd jot down some of the things I got out of these wonderful days...
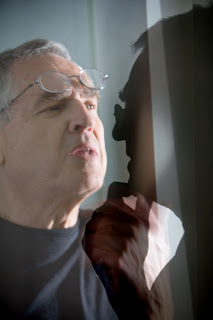 Figure and ground
Shape is the enemy of color
You can't step into the same river twice-stop and take the photo
Form over concept
No wallpaper
You're not as bad as you think
You're not as good as you think
Have lots of patience
Nothing's neutral. It either adds to or hurts the image.
Get in closer
No triangles in the corners
You are responsible for every square millimeter of the frame
Watch the edges
Everything has gesture--find good jesture
Forget the rules of composition
Make the image yours
Symbol vs anomoly
Interaction of colors alters the colors
Interruption of pattern
Boring or involving?
Accept Accidents
Don't get boxed in by preconceived ideas
If partially out of focus it competes
Out of focus foregrounds need to be completely out of focus so they become abstract elements
When you think you are done, do some more
Have an affect on the rest of your life
Learn to see better
Open your eyes
Carry a camera with you everwhere
Don't take the picture if it doesn't move you
Look behind you
Good photographers are blessed with the ability to extract passionate joy from things totally overlooked by most people
Shooting when you have nothing to say is worse than talking when you have nothing to say--In the first case you still have to go through the pictures at a later time
Thursday, May 17, 2007
Adjusting your viewfinder diopter setting
This is one of those questions that came up in a recent class. Some people never looked at this setting. Some just assumed to set it at zero. Some said they always wondered, but were afraid to ask. Some thought that it was too obvious to ask. Just about everyone was wrong.
The diopter control helps you focus on the viewfinder in the camera. If you wear eyeglasses you are probably familiar with the term diopter. Your eyeglass prescription may be described in diopters. If you are nearsighted your eyeglasses will have a negative diopter adjustment (i.e., -1.5). If you wear reading glasses they may be marked with a positive number (i.e. +2.25).
Camera viewfinders can be adjusted through a range of diopters, but the range may be different between models and brands of camera. -2 to +1 is a typical range.
So..., just how do you adjust this dial?
The first temptation is to look through the viewfinder and try to adjust it so that the image in the finder looks its best. Nope.
What you want to do is adjust it so that the items in the viewfinder (the etchings on the focusing screen, for instance) look clearest. Pay no attention to the image you are pointing the camera at when adjusting. Put the lens in manual focus mode, point the camera at a plain white wall, and throw the image completely out of focus. Now you can concentrate on the focusing screen. Does it have a circle etched in it? Or small boxes to show the autofocus points?
Put your diopter control all the way at one end of its range. Look at those etchings on the screen and slowly turn the dial until the screen is sharply focused. You might find two or three click settings that all look pretty good. It is like sitting in the chair at the eye doctors where they examiner is saying #1 or #2... #2 or #3...? Which looks better? Sometimes there is a big difference. Sometimes it is very subtle. Pick the one that looks the best.
Setting the diopter will not affect autofocus. But it will affect manual focusing. If set wrong, an in focus image will look out of focus in the viewfinder. But I don't think that you can do the reverse. That is, I don't think that you can make an out of focus image look in focus by adjusting the diopter.
Wednesday, May 16, 2007
Which macro lens should I get?
So, you want to get a macro lens. Which one should you get? There are a variety of different focal length macro lenses on the market. Typically they are aroun 50mm, 65mm, 100mm, and 180mm. Why select one focal length over another?The first thing that might come to mind is working distance. With a longer focal length lens you can be further from your subject at the same magnification. If you are photographing a flower or insect at 1:1 with a 50mm lens the distance between the camera and the subject is going to be very short. You will have little room for lights and skittish subjects will probably crawl or fly away. With the 100mm lens you will have a more comfortable working distance. With the 180 you will have lots of room.
Next, you might think about depth of field. But depth of field is more related to magnification than the focal length. If your subject is being recorded at 1:1 the depth of field is going to be just about the same with any of the lenses.
There is another consideration that many might not think of. The field of view. Field of view determines what you are going to see in the background and is, I think, the most important consideration affecting the final look of your image.
With a short focal length lens, which has a wide field of view, you will get a lot of the background in your image. Here are some examples. All were taken at an aperture of f/8.
The first image was taken with a 15mm full-frame fisheye lens with a 12mm extension tube to allow it to focus as close as possible...
 In this image the subject was literally touching the front element of the lens. And, as you can see, there are a lot of potentially distracting background elements. The main subject here is a bit smaller than in the other two images, but this was as large as this lens could reproduce the subject.
The next image was taken with a 50mm lens with both a 12mm and a 25mm extension tube, again at its closest focusing distance. Less background, but still distracting. You can see a chair, a white house, a brown fence, some green grass, etc.
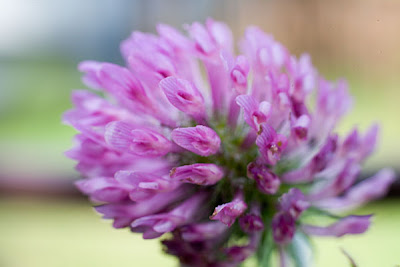 The final image was taken with a 180mm lens set for 1:1 reproduction. With its limited field of view the background is just the green grass.
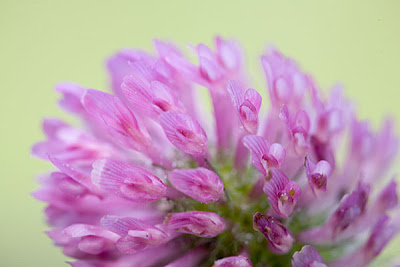
In the 50mm and 180mm versions the subject is appears almost identically. But the overall look is a lot cleaner with the longer lens.
Next, you might think about depth of field. But depth of field is more related to magnification than the focal length. If your subject is being recorded at 1:1 the depth of field is going to be just about the same with any of the lenses.
There is another consideration that many might not think of. The field of view. Field of view determines what you are going to see in the background and is, I think, the most important consideration affecting the final look of your image.
With a short focal length lens, which has a wide field of view, you will get a lot of the background in your image. Here are some examples. All were taken at an aperture of f/8.
The first image was taken with a 15mm full-frame fisheye lens with a 12mm extension tube to allow it to focus as close as possible...
 In this image the subject was literally touching the front element of the lens. And, as you can see, there are a lot of potentially distracting background elements. The main subject here is a bit smaller than in the other two images, but this was as large as this lens could reproduce the subject.
The next image was taken with a 50mm lens with both a 12mm and a 25mm extension tube, again at its closest focusing distance. Less background, but still distracting. You can see a chair, a white house, a brown fence, some green grass, etc.
 The final image was taken with a 180mm lens set for 1:1 reproduction. With its limited field of view the background is just the green grass.
In the 50mm and 180mm versions the subject is appears almost identically. But the overall look is a lot cleaner with the longer lens.
Tuesday, May 8, 2007
Resolution??
The short form:
#1, First thing, you should ignore resolution.
On its own, it ismeaningless. You have to combine it with a physical size.
For example, take a file that is 2000x1000 pixels. What is the resolution?
The answer is 72 dpi, or 100 dpi, or 200 dpi, or 300 dpi, or whateveryou want it to be. The DPI by itself means nothing.
That 2000x1000 pixel image will be:
at 72 dpi = 28 x 14 inches
at 200 dpi = 10 x 5 inches
at 300 dpi = 6.5 x 33 inches
That's all from the same file with no changes to it.
Typically, a 6 megapixel image will be something like 3072x2048pixels. If you set that to 180 dpi the size in inches will be 17.067x 11.378 inches. If you set it to 300 dpi it will be 10.24 x 6.827 inches.
As there are a number of 8 (and greater) megapixel cameras out now,here are the numbers for an 8mp image:
3504x2336 pixels
19.467 x 12.978 inches @ 180 pixels per inch
11.68 x 7.787 inches @ 300 pixels per inch
Some camera files claim to be 72 dpi. Others claim to be 180 dpi.Others might claim some other resolution. The amount of pixels is the important number. You can change the resolution at any time without affecting the file size/quality. Go to Image > Image Size and uncheck the RESAMPLE box. Then you can type in whatever resolution you want. The document size will change, but the pixel dimensions will not.
The Longer Version (click here).
Outdoor Fill Flash
How to mix strobe with sunlight
There are two basic concepts to keep in mind---
* The flash/strobe exposure is controlled by the aperture
* The ambient light exposure is controlled by the shutter speed
You are creating a double-exposure in one frame from two light sources.
The first think you need to know is the highest flash sync shutter speed for your camera. This is typically between 1/125 and 1/250 of a second, but varies by camera and could be higher or lower. This information is in your camera manual.
Start by metering the scene using the shutter speed about two stops lower than the max sync speed. For example., if your camera can sync at up to 1/250 of a second start the process by metering at 1/60 of a second (two stops lower than 1/250). Note the aperture required at that shutter speed. For example, let's say the meter said F/8 at 1/60.
Meter the flash/strobe with a hand-held flash meter. If the meter has a shutter speed setting set it to the max sync speed for your camera. For this example, let's say that the flash meter reads F/11.
Adjust the output of the flash to get a reading that matches the ambient light reading from the previous step. In this case we would lower the power of the flash 1 stop so that the meter reads F/8. If you cannot lower the flash power you will need to move the flash further away from the subject or add some diffusion material or neutral density filters over the flash to lower the output.
Set your camera (in Manual mode) to F/8 and 1/125. The scene should be balanced between the ambient and flash.
Now you can adjust your shutter speed for effect. A faster shutter speed will darken the background without making the flash-lit subject darker. But keep in mind that you can't set a shutter speed higher than your flash sync speed. A slower shutter speed will start to overexpose/wash out the background (make it brighter than the subject) But if you go too far you may also end up brightening the subject, too. And you also risk having some motion blur and ghosting around the subject (which is not necessarily bad, it can be an interesting effect).
But what happens if your flash exposure is F/22 but you want to photograph at F/8 or F/11? You have to lower the output of your flash unit. This can be done by lowering the power on the strobe. If you cannot lower it any more you can try moving the lights back (not good if you are trying to keep the light close and soft, moving them back may give too much contrast), or you can change the light quality by adding more diffusion, or you can use neutral density filters over the flash.
Another option is to use a Neutral Density (ND) filter on the camera. With a 3-stop ND filter your flash exposure will go from F/22 to F/8. Meter again for the ambient light with the ND filter in place to determine your balancing shutter speed. If you are using a hand-held meter for the ambient light remember to adjust it to take into account the ND filter. Again, you can adjust the shutter speed up/down to affect the look of the background (remember it has to be lower than the max sync speed of your camera).
Example:
Flash exposure f/22
Ambient exposure 1/60 @ F/22 (or 1/500 @ F/8)
Desired aperture F/8
Use a 3-stop neutral density filter:
Flash exposure F/8
Ambient Exposure 1/60 @ F/8
A Matter of Perspective
A common misconception is that lens focal length affects perspective.
Perspective is the image relationship between objects in a scene. This relationship is determined by the distance between the camera and the subject. You select the camera/subject distance to set the relationship you want and then you select the focal length of lens that will fill the film format you are using. Pretty basic—but often confusing.
Everyone knows that wide angle lenses make things look expansive with a lot of space between objects in the image and that telephoto lenses condense everything and make items in the scene look compressed and close to each other. And that is true. But it is not because of the focal length of the lenses being used.
When you are close to your subject you generally need a short (wide angle) lens to capture the scene. In the scene you may notice that objects very close to the camera appear to be much larger than similar sized images just slightly further away from the camera. This is not caused by the lens. It is a result of the front objects being relatively much closer to your camera than the further objects. When you are farther away from the subject you often use a long focal length (sometimes called telephoto) lens. In those images the relative distances between the camera and the subject and the distance between various objects in the scene are greater (the objects in the frame are closer to each other than they are to the camera) and the objects in the scene appear to be compressed closer to each other. Again, this is because of the distance between the camera and those objects, not because of the lens. The lens is just selected to fill the frame. Take the photo created with the short lens and enlarge it and you will see that objects in the distance have the same perspective as if they were taken with a longer lens and enlarged less.
Let's take an example of shooting a portrait. You typically want to be at least 6 feet from your subject when taking portraits. This sets up the relationships between you and your subject and between your subject's features (such as their nose, eyes, and ears). Let's say that the distance between the tip of your subject's nose and their ear is 6 inches. The camera to nose distance is 6 feet and the camera to ear distance is 6.5 feet. The ratio is 12:1. This gives a pleasing relationship and looks good. Now if you move in closer to your subject, let's say 3 feet, the nose to ear distance has not changed. The nose is now relatively much closer to the camera (ratio is 6:1) than the ear and it will appear to be too large giving your subject a distorted appearance. The distortion is caused by the closer subject distance. If you were able to focus a telephoto lens on the camera at the 3 foot distance you would see the same distortion as you do with a wide angle lens.
The difficulty in comprehending this situation is that you can’t focus the telephoto lens that close and, even if you could, the angle of view of the telephoto wouldn’t show enough of the subject to see the problem clearly. It might be easier to understand this by saying that a short/wide angle lens will allow you to see this perspective distortion because you can get so close, you can’t do that with a long/telephoto lens. Photographers tend to use a wide angle lens in situations which causes them to blame the lens for the distortion when the lens is just showing what it sees.
It is easier to demonstrate this by turning the situation around. Set up your camera on a tripod and have a subject seated 6 feet away from your camera. Take two photos; one with a long focal length lens and the other with a short focal length lens—do NOT move the camera or the subject between the shots. You should end up with one image (take with the long lens) having a larger subject than the other. Now open both images side by side on your computer and enlarge the image taken with the short lens so that the subjects face is the same size in both images. Note that the face looks exactly the same. No distortion "caused" by the wide angle lens. As stated earlier, you select your distance from the subject to set the relationship between the nearest and furthest objects in the scene, and then you select the lens whose focal length will fill the format of your film. Images taken with a short focal length lens will have a greater feeling of space and images taken with a long focal length lens will have a compressed feeling of space.
Remember that wide-angle is relative to the size of your film or sensor. If you are using a large format 8x10 view camera a 150mm lens is considered wide angle. On a 35mm camera 150mm is not.
 The above images are selections from the original photos in the first row. They have been enlarged so that the head appears at approximately the same size in each frame. They show that the relationship between the head and the background does not change when the camera remains in place and just the lens is changed. There is no change in perspective.
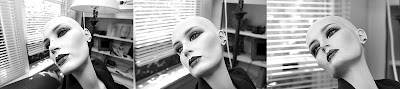 In this set of images the camera was moved closer to the subject for the 16mm and 35mm versions to approximate the same head size. This shows how the perspective does change when the camera to subject distance changes (from 6 feet for the 135mm photo to a foot or less for the 16mm photo. The perspective change is because the camera distance has changed, not because of the focal length of the lens.
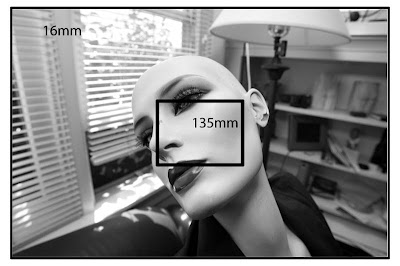
The image below attempts to simulates what it might be like to be able to take a photo from this close with a long lens. The full frame is taken with a 16mm wide angle lens. The box in the center shows what a longer focal length lens would see IF you could focus this close. The distortion would still be there, even though you are using a telephoto lens.
Perspective is the image relationship between objects in a scene. This relationship is determined by the distance between the camera and the subject. You select the camera/subject distance to set the relationship you want and then you select the focal length of lens that will fill the film format you are using. Pretty basic—but often confusing.
Everyone knows that wide angle lenses make things look expansive with a lot of space between objects in the image and that telephoto lenses condense everything and make items in the scene look compressed and close to each other. And that is true. But it is not because of the focal length of the lenses being used.
When you are close to your subject you generally need a short (wide angle) lens to capture the scene. In the scene you may notice that objects very close to the camera appear to be much larger than similar sized images just slightly further away from the camera. This is not caused by the lens. It is a result of the front objects being relatively much closer to your camera than the further objects. When you are farther away from the subject you often use a long focal length (sometimes called telephoto) lens. In those images the relative distances between the camera and the subject and the distance between various objects in the scene are greater (the objects in the frame are closer to each other than they are to the camera) and the objects in the scene appear to be compressed closer to each other. Again, this is because of the distance between the camera and those objects, not because of the lens. The lens is just selected to fill the frame. Take the photo created with the short lens and enlarge it and you will see that objects in the distance have the same perspective as if they were taken with a longer lens and enlarged less.
Let's take an example of shooting a portrait. You typically want to be at least 6 feet from your subject when taking portraits. This sets up the relationships between you and your subject and between your subject's features (such as their nose, eyes, and ears). Let's say that the distance between the tip of your subject's nose and their ear is 6 inches. The camera to nose distance is 6 feet and the camera to ear distance is 6.5 feet. The ratio is 12:1. This gives a pleasing relationship and looks good. Now if you move in closer to your subject, let's say 3 feet, the nose to ear distance has not changed. The nose is now relatively much closer to the camera (ratio is 6:1) than the ear and it will appear to be too large giving your subject a distorted appearance. The distortion is caused by the closer subject distance. If you were able to focus a telephoto lens on the camera at the 3 foot distance you would see the same distortion as you do with a wide angle lens.
The difficulty in comprehending this situation is that you can’t focus the telephoto lens that close and, even if you could, the angle of view of the telephoto wouldn’t show enough of the subject to see the problem clearly. It might be easier to understand this by saying that a short/wide angle lens will allow you to see this perspective distortion because you can get so close, you can’t do that with a long/telephoto lens. Photographers tend to use a wide angle lens in situations which causes them to blame the lens for the distortion when the lens is just showing what it sees.
It is easier to demonstrate this by turning the situation around. Set up your camera on a tripod and have a subject seated 6 feet away from your camera. Take two photos; one with a long focal length lens and the other with a short focal length lens—do NOT move the camera or the subject between the shots. You should end up with one image (take with the long lens) having a larger subject than the other. Now open both images side by side on your computer and enlarge the image taken with the short lens so that the subjects face is the same size in both images. Note that the face looks exactly the same. No distortion "caused" by the wide angle lens. As stated earlier, you select your distance from the subject to set the relationship between the nearest and furthest objects in the scene, and then you select the lens whose focal length will fill the format of your film. Images taken with a short focal length lens will have a greater feeling of space and images taken with a long focal length lens will have a compressed feeling of space.
Remember that wide-angle is relative to the size of your film or sensor. If you are using a large format 8x10 view camera a 150mm lens is considered wide angle. On a 35mm camera 150mm is not.
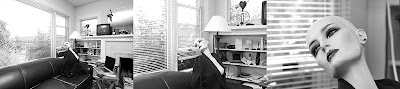
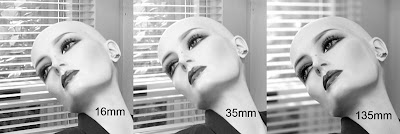
(click on the images below to see larger versions)
The images above were all taken from the same camera position. The camera was on a tripod and not moved between exposures, only the lenses were changed. The first shot is with a 16mm lens, the second with a 35mm, and the third with a 135mm lens. If you enlarge the section of the photos showing the head (as seen below) you will see that the relationship between the size of the objects (nose to eyes to ears, head to the window behind it, etc.) do not change (though depth of field does change, more is in focus in the image taken with the shorter lens). Even though we’ve used a super wide angle (16mm) and a telephoto (135mm) the perspective has not changed because the camera to subject distance has not changed.
The above images are selections from the original photos in the first row. They have been enlarged so that the head appears at approximately the same size in each frame. They show that the relationship between the head and the background does not change when the camera remains in place and just the lens is changed. There is no change in perspective. In this set of images the camera was moved closer to the subject for the 16mm and 35mm versions to approximate the same head size. This shows how the perspective does change when the camera to subject distance changes (from 6 feet for the 135mm photo to a foot or less for the 16mm photo. The perspective change is because the camera distance has changed, not because of the focal length of the lens.
The image below attempts to simulates what it might be like to be able to take a photo from this close with a long lens. The full frame is taken with a 16mm wide angle lens. The box in the center shows what a longer focal length lens would see IF you could focus this close. The distortion would still be there, even though you are using a telephoto lens.

Monday, May 7, 2007
Testing a teleconverter
This is a test of an older lens and teleconverter on a current digital body.
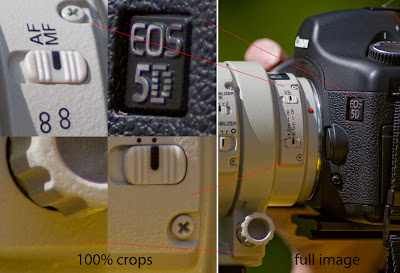
The body is the Canon 5D. The lens is a Canon 300mm F/4 L (not the current Image Stabilization model) and the converter is the Canon 2X converter (not the current Version II model). Click on the image below to see a full-size version (1000 pixels tall).
The body is the Canon 5D. The lens is a Canon 300mm F/4 L (not the current Image Stabilization model) and the converter is the Canon 2X converter (not the current Version II model). Click on the image below to see a full-size version (1000 pixels tall).

Overall, it works pretty well. This image was taken wide open (f/4 on the lens, effectively F/8 due to the use of the converter). The camera was on a monopod, not a tripod. Shutter speed was 1/500 second.
The file was created as a raw file and converted with Adobe Camera Raw 4.0. No sharpening has been applied in ACR or in Photoshop for this test.
There is noticeable red fringing in the tripod color locking knob in the lower left corner of the image, but this can be helped with the Lens Correction filter in Photoshop (under Filter/Distort/Lens Correction/Chromatic Aberration).
Digital Sensor Sizes and crop factors
Talking with some students and other friends, I still see/hear confusion about what it means to have a 35mm SLR style digital camera that has a sensor that is smaller than a 35mm film frame. So I'm trying to explain that here. What does it mean to have a camera that has a 1.6 focal length conversion factor?
Does that mean the camera crops the image? Does the camera magnify the image? Does it change the focal length of the lens? Something else going on?
Well, right off the bat we can eliminate the magnification or focal length questions. The focal length of the lens is a property of the lens and is not changed by what camera body it is attached to. A 50mm lens is a 50mm lens. No special voodoo magic in a camera body is going to change the focal length of the lens. What does change is the field of view of a lens. The lens projects an image circle. Different cameras make use of different angles of view within the projected image. Smaller sensor cameras discard the outer range of the circle. Is that a crop? You have to decide for yourself. I don't think it really matters. But some folks get very religious about this. Look at the figure here and decide for yourself if you want to say the camera is cropping out the outer range of the image circle or if you want to describe it some other way...
In the above example, the full rectagle is what your eye sees. The larger black circle represents the image circle projected by the lens. The blue rectangle represents what a full-frame 35mm size image sensor records. The red rectangle represents what a 1.6 crop-factor camera sees.
I think the entire situation is better comprehended by folks who grew up using a variety of different camera formats--especially a view camera with different size film backs, like my Deardorf 5x7 that also takes a 4x5 back. When you change the camera back from 5x7 to 4x5 without moving the camera or changing the lens you simply get less of the image in the frame. The lens didn't magically get larger. The image didn't magically get larger. The image projected by the lens is still exactly the same. It is just the area of it that is covered by film got smaller.
For those folks who never used a camera before, I don't really think it makes much difference in your taking photos. It does, though, make a difference if you are reading a book or article that assumes you are using a 35mm film (or full frame sensor) camera with lenses designed for those cameras. You have to take into account the crop/conversion factor. When a text says that you need to use a 70mm or greater lens for "normal" perspective in a portrait you have to convert that to say 44mm or greater if you have a 1.6 crop sensor (typical of many Canon dSLR cameras) or 47mm or greater with a 1.5 crop sensor (Nikon). It isn't the lens that distorts, it is the distance between the camera and the subject. But that is the subject for another blog entry.
As for how to describe the small sensor effect, you decide for yourself if you want to call it a crop of the full data or something else. Me? I'll just go out and make more photographs and not worry about it.
Wednesday, April 11, 2007
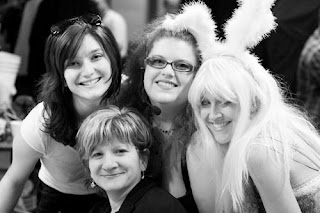
Mom turns 87!!
Mom's 87th birthday was Monday, April 9. She came over for dinner on Sunday and here are a few photos of her and her partner-in-crime, Norma.
The first has her in bunny ears (it was also Easter).
 Then we gave her a Birthday Hat...
 And then had her blow out some candles.

The first has her in bunny ears (it was also Easter).
 Then we gave her a Birthday Hat...
 And then had her blow out some candles.
Tuesday, April 10, 2007
Orchestra Seattle
I recently got a chance to work on a promotional calendar for Orchestra Seattle. Before the show I noticed that one of the viola players had a carbon fiber viola. I hadn't seen one of these before.
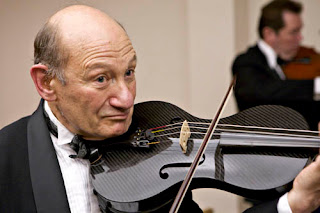
The calendar will be in black and white, but here is a photo of conductor George Shangrow in color...

The calendar will be in black and white, but here is a photo of conductor George Shangrow in color...

Monday, April 9, 2007
Getting back to photography
 OK, I wasn't away from photography. I took over 5000 images at the Moisture Festival. But back to the studio and one on one sessions.
This weekend I photographed a magnificent couple expecting a child in the next few weeks. Both mom and dad are very photogenic and were great to work with.


If you are looking for maternity portraits in the Seattle area send me an email.
Saturday, April 7, 2007
Easter Weekend
Someone recently looking at my images commented that this one reminded her of Easter (or maybe Good Friday). Anyway, here it is...

Did you ever get your holidays all mixed up? As a kid, did you get up early on Easter to find out if Jesus saw his shadow and we had 40 more days of Lent?

Did you ever get your holidays all mixed up? As a kid, did you get up early on Easter to find out if Jesus saw his shadow and we had 40 more days of Lent?
Thursday, April 5, 2007
Moisture Festival Photos online
I've put together a gallery of 300+ photos from the Moisture Festival. These can be viewed at http://www.cornicello.com/mfest07
Monday, April 2, 2007
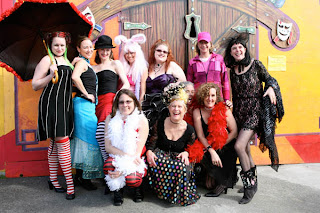
Time to rest!
Whew!! 5+ hour final show at the Moisture Festival last night.
Almost time to rest (still have to tear down a lot of equipment). Just stopping in quickly to post a photo of (just some!) the volunteer staff from the Festival. Thank you so much to all of you!!!
 Email me to get a larger version.
Almost time to rest (still have to tear down a lot of equipment). Just stopping in quickly to post a photo of (just some!) the volunteer staff from the Festival. Thank you so much to all of you!!!
 Email me to get a larger version.
Thursday, March 29, 2007


Wednesday, March 28, 2007
Final Weekend coming up...
 Tonight's show features the Circus Contraption band with Iman, Chantral, Hacki, the Flappers (aerial/hoop) and more.
Thursday night I'm back on stage with the Fremont Phil. Come on by to see Zero Boy, Tamara the Trapeze Lady, and more (see the schedule (pdf file) for more act listings.
This Saturday there is a kid's show matinee of Snow White and the Three Dwarfs at 3pm. Sunday is the final day with a matinee show at 3pm and a final night marathon at 7:30pm. The show could go one for 4+ hours on Sunday night.
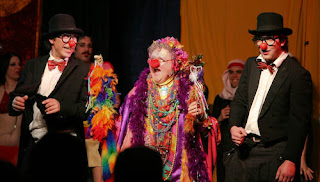
Here are Hacki, Moeppi and Seattle's own favorite, Dee Dee Rainbow.
Monday, March 26, 2007
Behind the Scenes
Here are some of the folks you don't get to see at the Moisture Festival. Mik and Christina wrangle all the performers and keep the backstage area running. Megan manages all the wonderful volunteer staff (such as the great Door Babes who greet you as you arrive at the Moisture Festival). And Katherine handles the box office.
And some of the famous and fabulous Door Babes...

 Tonight is Hacki's Pauper Night. 1/2 price shows with some performers you won't get to see any other nights. Don't miss it...

And some of the famous and fabulous Door Babes...

More backstage folks, including my mom, Norma (who is in charge of feeding all the performers), Kelly, and more...

And here (below) are performers Ruby, Martha, Trixie Little, and Iman getting ready to go onstage.
 Tonight is Hacki's Pauper Night. 1/2 price shows with some performers you won't get to see any other nights. Don't miss it...
 Saturday, March 24, 2007
Aerialistas in Blue
 What a great show at the ACT Theater. I'm sorry that I have to miss tonight's performances (because I'm playing in the band at the Hales venue). Here are a couple of photos of the Aerialistas at ACT...
For those interested, I have switched from using a 1DmkII to a 5D for the shows. Using a 24-70 and a 70-200IS lens. I also managed to get John Olufs, guitarist and band leader, into one of the images.

Tonight I'm back at Hales with The Bobs, Avner the Eccentric, Frank Olivier, Curly Burly, and more. Promises to be a great set of shows!

Friday, March 23, 2007
Busy night!
 Started out with dinner with Mom and Kim. Then I went off to photograph a show, and Mom and Kim went food shopping. Then I got a message from Simon telling me to call Kim ASAP. OK, something's up..., doesn't sound good.
Mom isn't feeling well. Pain and discomfort. Can't really describe it. I want them to go to the hospital (I'll meet them there). They want me to come home. They win out. I go to Mom's house and then they decide that the hospital is the place to go. Three hours of testing, standing around, more tests, etc. Everything seems to check out OK. Pain has gone away. But I'm glad we got her to go to the hospital and be checked out.
 This happened once before, a few years ago. I attributed it to indigestion. And today mom is thinking that maybe it was a reaction to the yogurt she had for lunch. We'll send her off to her regular doctor and keep an eye on her.
Once we got her home I went back to the theater to let folks know why I ran out so abruptly as the show was about to start and to let them know she seems to be OK. Mom is one of the "Door Babes" at the shows and has a lot of friends there.
As for the show, I got to take in most of the second half with the Bobs, Iman, the Canote Brothers, Frank Olivier, and a few others.

Tonight it is off to the Burlesque shows at the ACT Theatre. Tomorrow night I'm in the band at the Hale's Paladium shows. See you there...
Thursday, March 22, 2007
Back online...
 On another system this morning... And some additional photos...
Trixie Little & The Evil Hate Monkey trapeze act is new to the Moisture Festival 2007. Combine aerial, burlesque, kama sutra, and fun. Looking forward to seeing them at the Burlesque Shows this weekend.
Iman Lizarazu is back this year (after missing last year's festival). 
Tonight's show features The Bobs and a host of other great performers. Will I see you there?
Wednesday, March 21, 2007
More Moisture Festival

We are in full swing again! Here are some photos from this evening' show. Curly Burly put on a great show (as always).
More photos to come in the morning (Comcast doesn't seem to be doing so well this evening, my connection speed is atrociously slow!).
Monday, March 19, 2007
Monday is Dark
 Monday is a "dark" day for us. No shows. But rehearsals and tech work go on.
I just wanted to post a couple of more photos from this past weekend. To our left is Darty Kangoo (Lara Paxton) from Circus Contraption. And below is Fyodor Karamazov (Tim Furst) with his spinning light wands.

Sunday, March 18, 2007
More from the Moisture Festival
 Not too much to say (other than I stayed up too late the last two nights and finally got to sleep in this morning). But a few photos should help tell the story.
The Aerialistas made their first appearance at this years Moisture Festival appearance last night as the Faeries...

And the second show of the evening was Circus Contraption...

Subscribe to:
Posts (Atom)